Exhibition Stall Fabrication Timeline: From Brief to Installation
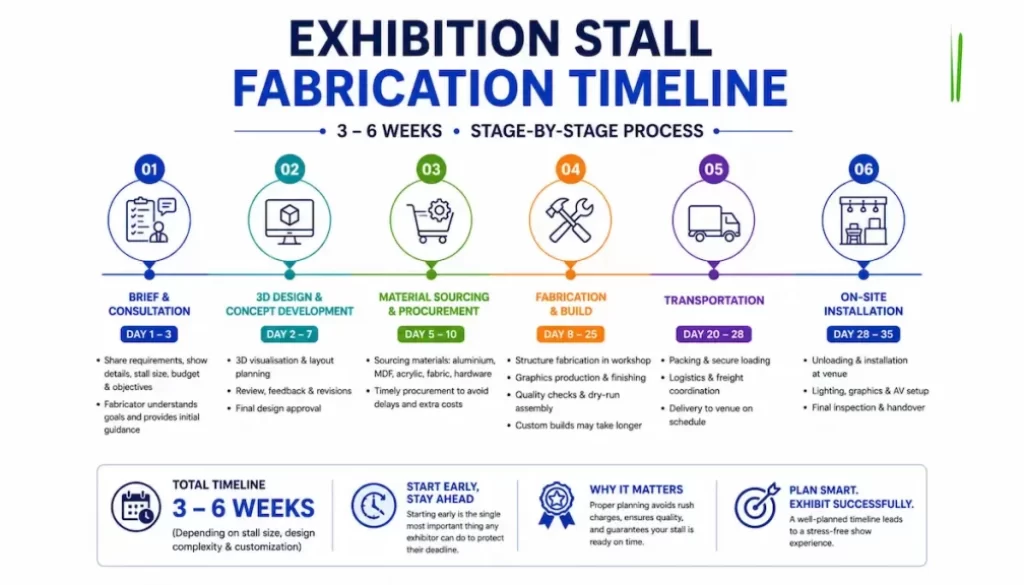
The exhibition stall fabrication timeline runs from 3 to 6 weeks, covering six stages: brief and consultation, 3D design, material sourcing, fabrication and build, transportation, and on-site installation. Custom-built stalls take the longest. Modular and flex frame stalls are faster. Starting early is the single most important thing any exhibitor can do to protect their deadline.
Exhibition Stall Fabrication Timeline: Why It Matters More Than You Think
Most exhibitors spend weeks preparing their product demos, their sales pitch, and their team briefings. Then they call a fabricator two weeks before the show and expect everything to be ready on time.
It rarely is.
Every stage of the exhibition stall fabrication timeline depends on the stage before it. Design needs an approved brief. Fabrication needs an approved design. Installation needs the build to be complete and transported to the venue. When any one stage gets rushed or delayed, every stage after it suffers too.
The result is a stall that arrives incomplete, looks unfinished, or gets set up in a panic on the morning of day one. None of those outcomes reflect well on your brand. Furthermore, last-minute work almost always costs more, because rush charges, expedited shipping, and overtime labour add up fast.
Understanding the full timeline helps you plan backwards from your show date. It gives you clear milestones to hit and enough buffer to handle the unexpected without losing your mind or your budget.
The Complete Exhibition Stall Fabrication Timeline Stage by Stage
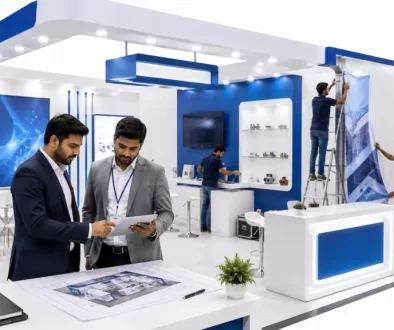
Stage 1: Brief and Consultation (Day 1 to Day 3)
Every project starts with a brief. This is where you share your requirements with your fabricator. You tell them your show name, your venue, your stall dimensions, your brand guidelines, your budget range, and what you want to achieve at the event.
A good fabricator asks the right questions at this stage. They want to know your industry, your target visitor, how many team members will be at the stall, and whether you need meeting areas, demo counters, AV screens, or storage.
The more detail you share at the briefing stage, the faster and more accurate the design process will be. Vague briefs produce generic designs. Specific briefs produce stalls that actually work for your business. Most fabricators complete the initial consultation within one to two days of first contact.
Stage 2: 3D Design and Concept Development (Day 2 to Day 7)
Once the brief is confirmed, the design team gets to work. This stage produces a 3D visualisation of your stall that shows exactly how the finished build will look, from the backdrop and counters to the lighting and floor layout.
The 3D design stage is critical for two reasons. First, it lets you see and evaluate your stall before a single component gets built. Second, it is where revisions happen cheaply. Changing a colour, moving a counter, or adjusting a graphic at the 3D stage takes hours. Making the same change during fabrication takes days and costs significantly more.
Review the 3D design carefully when you receive it. Check that your logo is correctly placed, your brand colours are accurate, your product display areas are functional, and the overall layout works for how your team will operate during the show. Request all revisions before you approve the design for fabrication.
Allow two to four days for initial concept delivery and one to two rounds of revisions. The total design stage typically takes five to seven days when both sides respond promptly.
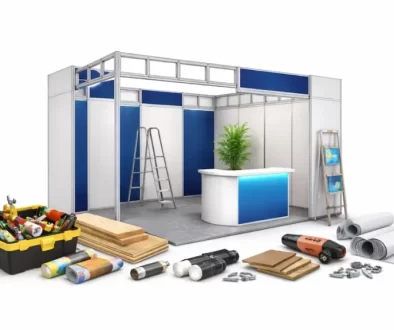
Stage 3: Material Sourcing and Procurement (Day 5 to Day 10)
Once the design gets approved, the fabrication team sources the materials needed to build your stall. This includes structural materials like aluminium profiles, MDF boards, and hardware, as well as surface materials like fabric, acrylic, laminates, and vinyl.
For standard stall types, most materials are readily available. However, custom or specialty elements sometimes require lead time, especially if specific finishes, imported hardware, or custom-fabricated components are involved.
This stage is one of the clearest reasons why a proper exhibition stall fabrication timeline protects your budget. When a fabricator has adequate time, they source materials at standard cost. When they work against a tight deadline, they pay premium prices for expedited sourcing, and those costs pass directly on to you.
Stage 4: Fabrication and Build (Day 8 to Day 25)
This is the core of the entire exhibition stall fabrication timeline. The actual building happens here.
Structure Fabrication
The structural components of your stall take shape first. Carpenters, welders, and fabrication specialists build the frames, walls, counters, and any custom architectural elements. This work happens entirely in a workshop, not at the venue. Quality fabrication takes time because each component needs to be built accurately and finished properly before it goes anywhere near a show floor.
Graphics Production
Simultaneously, the graphics team prepares your branding materials for print. This includes backdrop graphics, counter wraps, hanging signs, floor graphics, and any other branded surface elements. Files go through pre-press checks to ensure colours are correct, resolution is high enough for large-format printing, and bleed areas are accurate. Then printing and finishing happen, which includes lamination, mounting, or fabric stretching depending on the panel type.
Quality Checks
Before anything leaves the workshop, it goes through a quality check. The stall components get partially assembled in the workshop to verify that everything fits correctly, lighting works, and the overall finish meets the required standard. This dry-run assembly catches problems while there is still time to fix them before the show.
Allow 10 to 15 days for fabrication of a standard custom stall. Larger or more complex builds such as double-decker stalls or island configurations over 36 square metres may need 18 to 25 days. Modular and flex frame stalls typically fabricate faster, often in 7 to 10 days, because the structural system is already in place and only graphics need to be produced.
Stage 5: Transportation and Logistics (Day 20 to Day 28)
Once fabrication completes, the stall components are packed carefully and transported to the venue city. For shows in the same city as the fabrication workshop, this is straightforward. For shows in a different city, it involves road freight, air freight, or a combination depending on the timeline and fragility of the components.
Good fabricators label and catalogue every component before packing. This makes unpacking and assembly at the venue significantly faster. It also reduces the risk of missing parts causing delays on installation day.
If your show is in a different city, factor in two to four days for transportation depending on the distance. Always confirm with your fabricator that transport is booked well in advance, particularly during peak exhibition season when freight capacity fills up quickly.
Stage 6: On-Site Installation (Day 28 to Day 35)
Installation is the final stage of the exhibition stall fabrication timeline. The fabricator’s on-site team arrives at the venue during the designated setup period, which most shows schedule one to two days before opening day.
Venue Setup Regulations
Every exhibition venue has specific setup rules. These cover the hours during which contractors can work, the types of materials permitted, electrical load limits, height restrictions, and safety compliance requirements. An experienced fabricator knows these rules and plans the installation schedule around them accordingly.
Installation Sequence
Installation follows a clear sequence. The structural frame goes up first, followed by panels and wall elements, then counter units and furniture, then lighting rigs, then graphics application, and finally dressing and finishing touches. Rushing any step in this sequence creates problems in the steps that follow.
Snagging and Final Check
After the main installation is complete, the team does a final walkthrough to check every element. They fix any graphics that are not perfectly applied, adjust lighting angles, ensure counters are stable, and confirm that all electrical elements work correctly. This snagging stage is what separates a stall that looks finished from one that looks almost finished.
Allow one to two full days for installation of a standard stall. Larger builds need more time. Always confirm installation timelines with your fabricator before the show so you know exactly when your stall will be ready.
Timeline Breakdown by Stall Type
Different stall types sit at different points on the exhibition stall fabrication timeline. Here is a practical breakdown to help you plan.
Shell Scheme Upgrades
A shell scheme stall uses the organiser-provided structure. Your fabricator adds branded graphics, counters, and lighting on top of it. Because the structure is already in place, fabrication time is significantly shorter. Allow 1 to 2 weeks from brief to delivery for a well-planned shell scheme upgrade.
Flex Frame and Fabric Display Stalls
Flex frame systems use lightweight aluminium frames with fabric graphics. The structural components are usually standard and ready to go. Most of the production time goes into design and graphics printing. Allow 2 to 3 weeks from brief to installation for a flex frame stall.
Modular Exhibition Stalls
If you already own a modular system, your timeline drops to primarily graphics production and any new component additions. Allow 2 to 3 weeks for a modular stall refresh. If you are ordering a modular system for the first time, allow 3 to 4 weeks.
Custom-Built Stalls
Custom-built stalls require the most time because everything gets created from scratch. The design is unique, the structural components are purpose-built, and the finishing is more detailed. Allow 4 to 6 weeks minimum for a standard custom-built stall. For large island stalls, double-deckers, or builds over 50 square metres, allow 6 to 10 weeks.
Government and Pavilion Stalls
These projects often involve multiple stakeholder approvals, organiser coordination, and compliance checks that add time to the standard process. Allow 6 to 8 weeks minimum when pavilion or government stall projects are involved.
What Delays the Exhibition Stall Fabrication Timeline
Understanding common delay causes helps you avoid them before they hit your project.
Slow Approvals from the Client Side
The most common cause of delay is not on the fabricator’s side. It is slow decision-making from the client side. When design approvals take a week instead of a day, the fabrication window shrinks accordingly. Assign one person internally to own the approval process. Set clear internal deadlines for each stage and stick to them.
Last-Minute Brief Changes
Changing your messaging, adding a new product, or requesting a structural layout change after fabrication has started costs time and money. Make all major decisions before you approve the 3D design. That is the right time for changes. After fabrication begins, changes become expensive and sometimes impossible to execute in time.
Peak Exhibition Season Congestion
Certain months see a concentration of major trade shows across India. During these periods, good fabricators are fully booked. Materials are in higher demand. Freight capacity fills up quickly. If your show falls during a peak period, start your exhibition stall fabrication timeline planning even earlier than the standard recommendation.
Incomplete or Incorrect Brand Files
Fabricators need print-ready artwork files to produce your graphics. When clients supply low-resolution logos, incorrect colour codes, or files in the wrong format, the graphics team spends extra time requesting corrections and waiting for replacements. Supply complete, correct brand files as early in the process as possible.
How Peacemedia Keeps Every Stage on Schedule
Most fabrication delays happen at handover points. When design goes to an external agency, fabrication goes to a subcontractor, and installation goes to a third-party crew, every gap between those teams is a place where time gets lost and accountability disappears.
Peacemedia eliminates those gaps entirely. Their entire process runs in-house under one roof. The same team that designs your stall also builds it, prints the graphics, packs it for transport, and installs it at the venue. There are no handovers and miscommunications between agencies. There are no delays caused by one vendor waiting on another.
Their project managers track every stage of the build against your show deadline from day one. If a material takes longer to arrive, they adjust the build sequence to keep the overall timeline intact. If a design revision comes in late, they absorb it without pushing the delivery date. This kind of tight coordination is only possible when everything happens under one roof.
Peacemedia also carries stock of commonly used structural components and materials. Standard projects therefore do not wait on procurement. The build starts as soon as the design gets approved, which protects the earliest and most important part of your exhibition stall fabrication timeline.
To discuss your specific show date and get a realistic timeline built around your project, visit peacemedia.in/contact-exhibition-fabricator.
📞 Call: +91 9024 924 924
🌐 Visit: peacemedia.in
Frequently Asked Questions
What is the exhibition stall fabrication timeline for a custom-built stall?
A custom-built stall typically needs 4 to 6 weeks from the initial brief to on-site installation. This covers design, material sourcing, fabrication, graphics production, quality checks, transportation, and installation. Larger or more complex builds may need 6 to 10 weeks.
What is the fastest a stall can be fabricated?
Simple shell scheme upgrades and flex frame displays can sometimes get delivered in 7 to 10 days in genuine emergencies. However, rushing fabrication increases risk, reduces quality, and almost always costs significantly more. Starting early is always the better approach.
When should I contact a fabricator before my trade show?
Contact your fabricator at least 6 weeks before your show date for a custom stall. For modular or flex frame stalls, 3 to 4 weeks is the minimum. The earlier you start, the more time you have for design revisions, quality fabrication, and smooth logistics.
What information do I need to provide at the start of the process?
Share your show name, venue, stall dimensions as given by the organiser, brand guidelines including logos and colour codes, your budget range, and what you want the stall to achieve. The more detail you provide upfront, the faster and more accurate your exhibition stall fabrication timeline will be.
What happens if my stall is not ready on time?
An incomplete or rushed stall on show day damages your brand impression in front of exactly the audience you came to impress. It also causes significant stress for your team. The best way to avoid this entirely is to start the process early and work with a fabricator who manages every stage in-house.
Final Thoughts
The exhibition stall fabrication timeline is not just a logistics detail. It is a quality control factor.
Every stage of the process needs adequate time to get done properly. When one stage gets squeezed, it squeezes every stage after it. The stall that arrives on time, looks sharp, and performs well on the show floor is almost always the one where planning started early enough to breathe.
Give your fabrication timeline the respect it deserves. Your brand, your team, and your results at the show will all be better for it.
Planning your next exhibition? Contact Peacemedia today and get your 3D stall concept within 8 working hours of your brief.